This guide will require use of the Terminal, so get ready for some typing. You will also need to install Xcode from the App Store.
First you will need mjminer source code, you can download it from GitHub here: https://github.com/r-majere/mjminer. After downloading it, unzip the contents and open up the Terminal to the location of where you unzipped these files.
If you haven't used Xcode command line tools, you will be prompted to install them, just follow the steps there and when done return to this guide.
Type in the following in the Terminal (substitute the location of where you unzipped mjminer as required):
Terminal
cd ~/Downloads/mjminer-master
make
The above will compile mjminer, you will get output similar to this:
Terminal
--- Compiling for 64-bit arch ---
CFLAGS=-D OSX -D AMD64 -O2 -Wall -D_FILE_OFFSET_BITS=64 -m64
as -o shabal64-darwin.o shabal64-darwin.s
gcc -Wall -m64 -c -O2 -march=native -o mshabal_sse4.o mshabal_sse4.c
gcc -Wall -m64 -c -O2 -march=native -mavx2 -o mshabal256_avx2.o mshabal256_avx2.c
gcc -D OSX -D AMD64 -O2 -Wall -D_FILE_OFFSET_BITS=64 -m64 -c -o helper.o helper.c
gcc -D OSX -D AMD64 -O2 -Wall -D_FILE_OFFSET_BITS=64 -m64 -o plot plot.c shabal64-darwin.o mshabal_sse4.o mshabal256_avx2.o helper.o -lpthread -std=gnu99 -DAVX2
gcc -D OSX -D AMD64 -O2 -Wall -D_FILE_OFFSET_BITS=64 -m64 -o optimize optimize.c helper.o
gcc -D OSX -D AMD64 -O2 -Wall -D_FILE_OFFSET_BITS=64 -m64 -DSOLO -o mine mine.c shabal64-darwin.o helper.o -lpthread
gcc -D OSX -D AMD64 -O2 -Wall -D_FILE_OFFSET_BITS=64 -m64 -DURAY_POOL -o mine_pool_all mine.c shabal64-darwin.o helper.o -lpthread
gcc -D OSX -D AMD64 -O2 -Wall -D_FILE_OFFSET_BITS=64 -m64 -DSHARE_POOL -o mine_pool_share mine.c shabal64-darwin.o helper.o -lpthread
To plot your drive, you do not need your wallet running and you don't have to have activated your wallet either. You should, however, activate your wallet by getting a starting burst coin from a facet and then updating your account info, which will cost 1 coin, so you'll be back to zero balance.
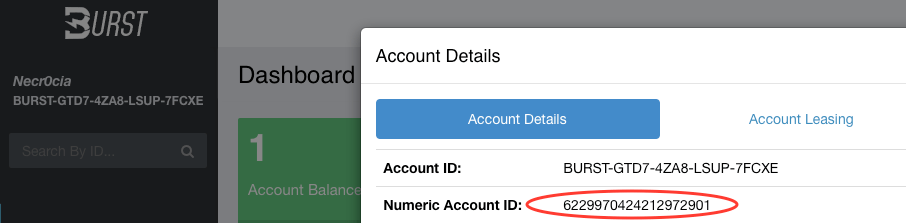
While doing that, from your burst wallet, click the More Info link under the account balance to get your numeric ID. This ID will be needed for plotting. You can see where this is found in the screenshot below:
So now you got mjminer compiled and have your numeric ID you can work out how many nonces to plot. I'm going to assume that you are going to use an external drive and will use all of its space for the plots. Make sure your drive is not FAT32 formatted! I was stuck on this for a long time since the maximum file size with FAT32 is 4Gb. I used exFAT for my external drive because I wanted to be able to share the plot file with a Windows laptop for actual mining. With exFAT you're not limited to 4Gb per file either.
Here's something to keep in mind, a nonce is 256Kb in size. So it means every Mb gives you 4 nonces. This is important for figuring out some numbers below.
First lets see how many nonces you can fit into your external disk. Type this in the Terminal (assuming your external disk is connected and formatted).
Terminal
df -g
You will get output like this (omitting some output for brevity):
Terminal
Filesystem 1G-blocks Used Available Capacity iused ifree %iused Mounted on
...
/dev/disk3s2 1862 0 1862 1% 79 15258649 0% /Volumes/STORY
The 'STORY' volume is what my external disk was called. The Available size is how many Gb you have available for nonces, in my case this was 1862.
To work out how many nonces you can create, multiply the available Gb by 1024, then again by 4. For example 1862*1024*4 = 7626752.
Next you need to decide on the how much memory to use for mining/plotting. This should be a multiple of your RAM. I chose 2Gb since the computer I was going to mine on only has 4Gb total.
Knowing how much RAM you want to use you can calculate the stagger size, which is given in nonces! So in my case I wanted to use 2Gb, which means the actual stagger size is 2*1024*4 = 8192. A little confusing at first, but once you understand that 1Mb = 4 nonce, it's easy.
The stagger size should also evenly divide into the number of nonces you are going to create. Adjust the number of nonces if it doesn't fit evenly by reducing your nonce count. For example - taking the total nonce count in my case and dividing it by the stagger size gives this: 7626752/8192 = 931. So that works out even. However, if you were to have say 3813376 nonces, it gives this: 3813376/8192 = 465.5. That needs to be adjusted. Easiest way to adjust the nonce count is to take the number from before the decimal point and multiply by the stagger size i.e. 465*8192 = 3809280.
Ok so finally putting all this together you can start your plotting!
Create a directory for your plots and start the plotter with the following commands from the directory where you compiled mjminer. Adjust for the external drive name, the number of nonces you are creating and the stagger size. Also replace your_numeric_id with the your actual burst numeric ID.
Terminal
mkdir -p /Volumes/STORY/plots
./plot -k your_numeric_id -d /Volumes/STORY/plots -x 2 -s 0 -n 7626752 -m 8192
If everything goes right, you should see output similar to this:
Terminal
Using AVX2 core.
Creating plots for nonces 0 to 7626752 (2000 GB) using 2048 MB memory and 8 threads
0 Percent done. 4950 nonces/minute, 25:30 left
Now you wait. In my case plotting 2Tb of disk space took about a day and a half. The Mac CPU usage goes to 100% from time to time, then it drops to 0% and writes to disk, the process repeats over and over until the whole plot is completed.
That's it for this guide. If you find it useful and want to send a small donation of Burst, you can send it here:
BURST-GTD7-4ZA8-LSUP-7FCXE
If you are mining in a pool, you may find this article intersting - Twelve elements of the Burst Mining Pool interface explained.
-i
