This is part four of this blog post, if you haven't seen the first, second or third part, you can find them here: https://www.igorkromin.net/index.php/2015/04/06/raspberrypi-and-a-usb-monitor-combined-to-make-a-photo-frame-part-1/ and https://www.igorkromin.net/index.php/2015/04/07/raspberrypi-and-a-usb-monitor-combined-to-make-a-photo-frame-part-2/ and https://www.igorkromin.net/index.php/2015/04/12/raspberrypi-and-a-usb-monitor-combined-to-make-a-photo-frame-part-3/.
In the previous parts I had the photo frame completely set up and working, except for one bit - it had no website. This part shows how I've set up Apache to run on the Raspberry Pi, what changes I've made to the configuration to make it possible to control the photo frame and then finally the photo frame HTML page itself (PHP actually).
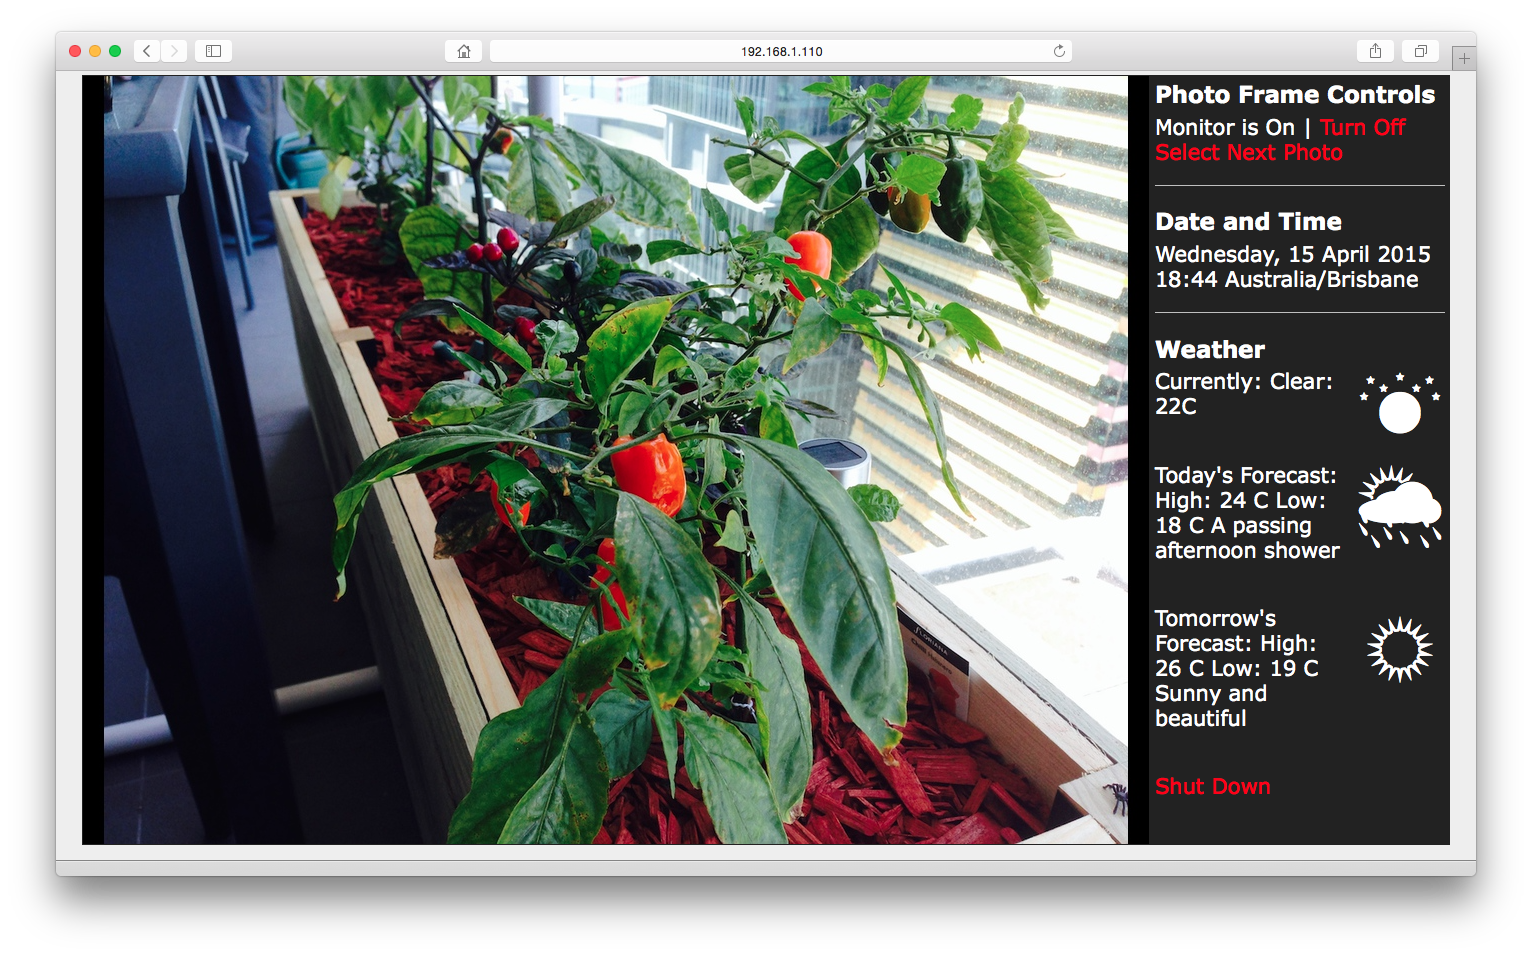
This is the end result for the web presence for the photo frame. It is possible to turn the monitor on or off, select the next photo and even shut down the photo frame. Everything is scripted using PHP, some HTML and some CSS.
To get this working I installed the following two packages: apache2, php5. I then deleted the default /var/www/index.html file and added my own content to the www directory. Those details later. Once Apache is installed, it will start up automatically the next time that the Raspberry Pi is restarted.
To get the web page able to control the photo frame, Apache needed to be give the right permissions. Since my photo frame was only ever going to be on my network, I thought it would be safe to give sudo access to Apache. This is dangerous to do and should usually not be done unless the device is running on an isolated network. You've been warned.
Here's how I did it, using visudo I added the following line to the sudoers file:
sudo visudo
www-data ALL=(ALL) NOPASSWD: ALL
Now to make sure that I could serve the right photo via the web page, I made a symlink:
Terminal
sudo ln -s /photos/cache/current.jpg /var/www/current.jpg
Next, I copied the ConkyWeather.ttf to the /var/www directory, and finally I created the following files to serve the web page itself...
pp.css
@font-face {font-family: 'ConkyWeather'; src: url('ConkyWeather.ttf')}
body {margin:0;padding:4px;background-color:#eee;font-size:16pt;font-family:Verdana;color:White;}
a {text-decoration:none;color:Red;}
.heading {font-size:17pt;font-weight:bold;padding-bottom:0.25em;}
.separator {border-top:1px solid silver;margin-top:1em;padding-top:1em;}
.weather {font-family:'ConkyWeather';font-size:90px;float:right;padding-left:8px;}
.weather2 {margin-bottom:2em;clear:both;}
pp.php
<?php
$cmd = (isset($_GET["c"])) ? $_GET["c"] : "";
switch ($cmd) {
case "on":
exec("sudo su pi -c 'xset dpms force on -display :0'"); break;
case "off":
exec("sudo su pi -c 'xset dpms force off -display :0'"); break;
case "next":
exec("sudo su pi -c '/photos/cache/select.sh'"); break;
case "halt":
exec("sudo su -c 'shutdown -h now'"); break;
}
if ($cmd != "") {
header("Location:/");
exit();
}
$monStateTxt = trim(shell_exec("sudo su pi -c 'xset q -display :0|grep Monitor'"));
$monStateOff = strpos($monStateTxt, "Off") > 0;
$weather = file("/home/pi/1d_accuweather_rss/weather");
header("Cache-Control: no-cache, must-revalidate");
header("Expires: Sat, 26 Jul 1997 05:00:00 GMT");
?>
index.php
<?php
include "pp.php";
?>
<html>
<head>
<title>Photo Frame</title>
<link rel="stylesheet" type="text/css" href="pp.css">
</head>
<body>
<div style="margin-left:auto;margin-right:auto;background-color:#222;width:1366px;height:768px;border:1px solid #222;">
<img style="vertical-align:top;" src="current.jpg?<?php echo rand(); ?>" width="1066" height="768"/>
<div style="padding:4px;float:right;right:0;width:290px;">
<div class="heading">Photo Frame Controls</div>
<?php
echo $monStateTxt . " | ";
if ($monStateOff) {
echo '<a href="/?c=on">Turn On</a>';
}
else {
echo '<a href="/?c=off">Turn Off</a>';
}
?>
<br><a href="/?c=next">Select Next Photo</a>
<div class="separator"></div>
<div class="heading">Date and Time</div>
<?php echo nl2br(date("l, j F YnH:i e")); ?>
<div class="separator"></div>
<div class="heading">Weather</div>
<div class="weather2">
<div class="weather"><?php echo $weather[1]; ?></div>
<?php echo $weather[0]; ?>
</div>
<div class="weather2">
<div class="weather"><?php echo $weather[4]; ?></div>
Today's Forecast: <?php echo $weather[3]; ?>
</div>
<div class="weather2">
<div class="weather"><?php echo $weather[7]; ?></div>
Tomorrow's Forecast: <?php echo $weather[6]; ?>
</div>
<a href="/?c=halt">Shut Down</a>
</div>
</div>
</body>
</html>
That's it. The links on the web page are processed using PHP, which executes some commands on the shell. Very simple, but a little unsafe, however it works to get the intended job done.
This is it for the write up about the photo frame. It took a while to get all of the information online, but hopefully this means that the whole project can be reproduced by others. Enjoy!
-i
