I've written disparate articles on related topics here, here and here but have never tried to put it all into one coherent guide, until now.
This guide assumes that you're going to do the initial part of the setup on a Mac running OS X. It also assumes you have a Raspberry Pi Model A and a USB monitor to drive your photo frame. I won't be covering any of the physical construction aspects of the photo frame, this is purely how to set up all the software, file sharing, etc.
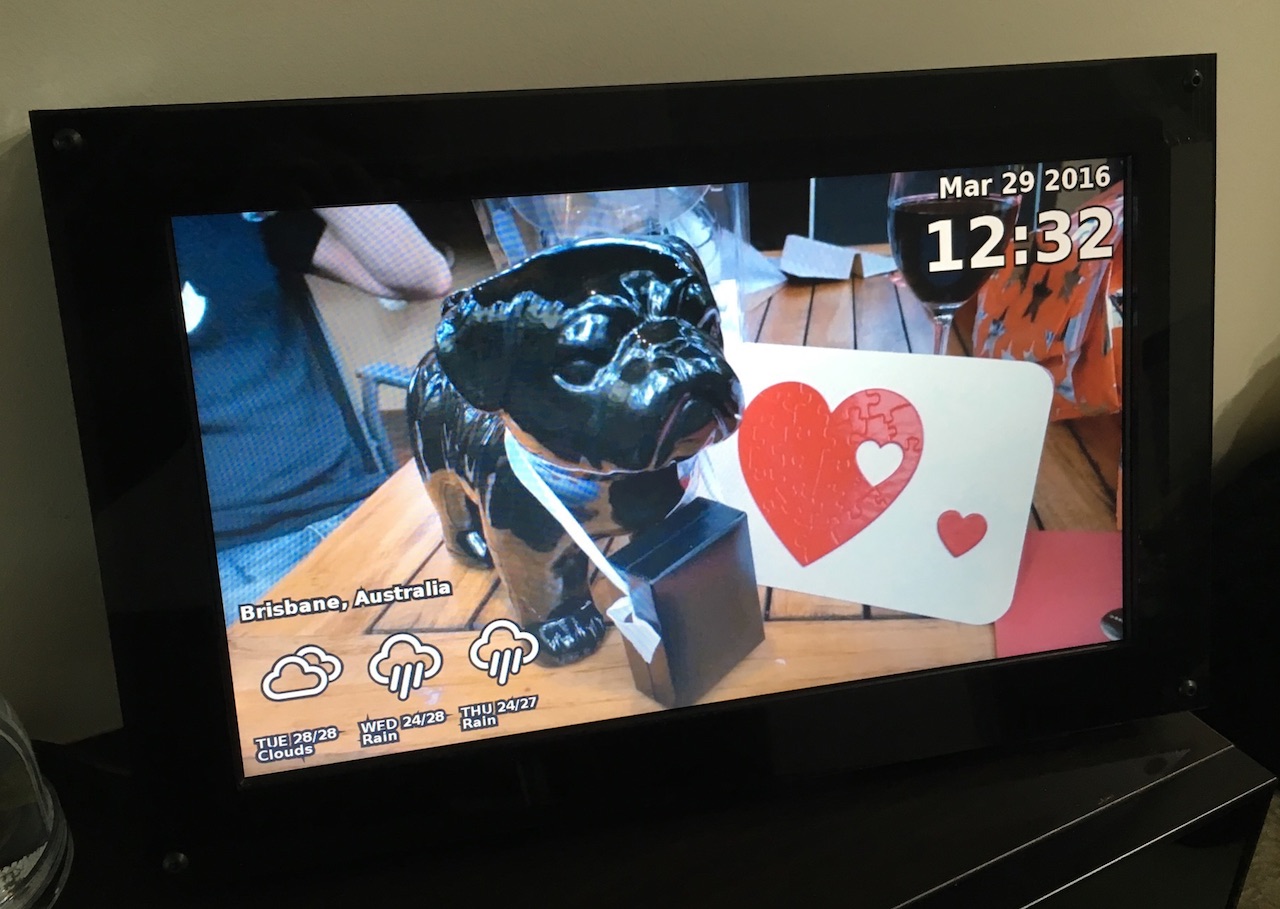
The end result is something like this...
What you will need:
- Raspberry Pi
- USB Monitor
- SD Card (1Gb)
- 8Gb+ USB key
- USB Keyboard
Create a bootable SD Card
First download the following:
- ApplePi-Baker http://www.tweaking4all.com/hardware/raspberry-pi/macosx-apple-pi-baker/.
- Minibian-wifi https://sourceforge.net/projects/minibianwifi/.
Using ApplePi-Baker run the 'Restore Backup' for the Minibian-wifi image e.g. 2015-12-30-wheezy-minibian-wifi.img.
Eject the SD card, which now has the Minibian-wifi image, insert it into your Raspberry Pi, power on and let it boot up.
Everything that follows must be done on the RPi as the 'root' user...
Note1: Wherever you see file contents listed without further instructions, simply copy/paste what's shown into the file specified.
Note2: Wherever you see a 'Commands' listing, type those commands into the RPi as shown.
Network Setup
Update the /etc/wpa_supplicant/wpa_supplicant.conf file with your WiFi information, update network details to assign a static IP address similar to the following. A static IP is not necessary but useful for the future so you don't have to guess the IP address when connecting to the RPi.
/etc/network/interfaces
auto lo
iface lo inet loopback
allow-hotplug wlan0
iface wlan0 inet manual
wpa-roam /etc/wpa_supplicant/wpa_supplicant.conf
iface default inet static
address 192.168.1.254
netmask 255.255.255.0
gateway 192.168.1.1
Disk Partitioning and Resizing
Because SD cards are slow we will transfer the OS to a USB key.
Partition the USB key. Delete any old partitions first, then create a new primary partition.
Commands
fdisk /dev/sda
d
1
n
p
1
2048
(accept default)
w
Copy the file system from the SD card to a USB key.
Commands
dd bs=1M if=/dev/mmcblk0p2 of=/dev/sda1
Resize the file system to make use of all the extra space on the USB key.
Commands
e2fsck -f /dev/sda1
resize2fs /dev/sda1
Update fstab so that it reflects the new location of the OS.
/etc/fstab
/dev/mmcblk0p1 /boot vfat defaults 0 2
/dev/sda1 / ext4 errors=remount-ro,noatime,defaults,sync 0 1
Edit the /boot/cmdline.txt file and make sure the root option is set as this: root=/dev/sda1.
Restart the RPi.
Update the OS and Install Additional Software
We're going to need some additional software to compile the Kernel and also to get JPhotoFrame source code and build it.
Commands
apt-get -y update
apt-get -y dist-upgrade
apt-get -y install raspi-config gcc make bc screen ncurses-dev git ant dosfstools lxde oracle-java7-jdk netatalk samba samba-common-bin unclutter dphys-swapfile
Run Raspi-Config and do the following: Overclock to Turbo. Change time zone to your relevant setting. Restart the RPi.
Compile the Kernel
Because we're using a USB monitor and the default kernel build doesn't have this included we need to build this into the kernel. There are some good guides on how to do this here and here and I'm providing the condensed version of the commands to run below.
Check out the Kernel source.
Commands
mkdir ~/kernel && cd ~/kernel
git clone --depth=1 https://github.com/raspberrypi/linux
cd linux
Configure the Kernel.
Commands
KERNEL=kernel_new
make mrproper
modprobe configs
zcat /proc/config.gz > .config
make bcmrpi_defconfig
make menuconfig
Navigate to the following option: Device Drivers -> Graphics Support -> Frame buffer devices -> Displaylink USB Framebuffer support. Press 'Y' and save and exit.
Compile the Kernel.
Commands
make zImage modules dtbs
make modules_install
cp arch/arm/boot/dts/*.dtb /boot/
cp arch/arm/boot/dts/overlays/*.dtb* /boot/overlays/
cp arch/arm/boot/dts/overlays/README /boot/overlays/
scripts/mkknlimg arch/arm/boot/zImage /boot/$KERNEL.img
Edit /boot/config.txt and add this line to the top of the file:
/boot/config.txt
kernel=kernel_new.img
Configure the swap file
JPhotoFrame may need more memory than the RPi actually has (depending on the size of your photo library) so it's a good idea to configure some swap space.
/etc/dphys-swapfile
CONF_SWAPSIZE=1024
Enable swap space.
Commands
dphys-swapfile setup
dphys-swapfile swapon
Configure File Sharing
Create Photos directory (copy some photos to it later).
Commands
mkdir -p /photos/cache
chmod 777 /photos
chmod 777 /photos/cache
Configure AFP file sharing.
/etc/avahi/services/afp.service
<?xml version="1.0" standalone='no'?><!--*-nxml-*-->
<!DOCTYPE service-group SYSTEM "avahi-service.dtd">
<service-group>
<name replace-wildcards="yes">%h</name>
<service>
<type>_afpovertcp._tcp</type>
<port>548</port>
</service>
<service>
<type>_device-info._tcp</type>
<port>0</port>
<txt-record>model=iMac</txt-record>
</service>
</service-group>
Put the following line at the bottom of /etc/netatalk/afpd.conf file, replacing any existing default.
/etc/netatalk/afpd.conf
- -tcp -noddp -uamlist uams_dhx.so,uams_dhx2.so,uams_guest.so -nosavepassword
/etc/netatalk/AppleVolumes.default
/photos Photos allow:nobody options:usedots,upriv
Configure Samba file sharing.
/etc/samba/smb.conf
[global]
map to guest = bad user
wins support = yes
server string = %h
[photos]
comment=Photos
path=/photos
browsable=Yes
writable=Yes
only guest=Yes
public=Yes
Configure the host name.
/etc/hostname
PhotoFrame
Disable Power Management
Because this is a photo frame and it should be on most of the time, some of the built-in power management needs to be disabled.
Disable screen blanking. In /etc/kbd/config look for the following settings and set them to 0.
/etc/kbd/config
BLANK_TIME=0
POWERDOWN_TIME=0
Set X server power management. In /etc/lightdm/lightdm.conf make sure that the xserver-command is set as follows:
/etc/lightdm/lightdm.conf
[SeatDefaults]
xserver-command=X -s 0 dpms
Configure the 'pi' user and Automatic Login
Create the pi user.
Commands
useradd -m pi
passwd pi
Enable automatic login by running raspi-config.
Select Enable Boot to Desktop/Scratch > Desktop Log in as user 'pi' at the graphical desktop. Exit and optionally restart.
Everything that follows must be done as the 'pi' user...
Set up the Desktop Environment
Because this is a photo frame, we don't want the desktop to really be visible so most features need to be disabled and desktop icons removed. These are my configuration files for LXDE.
/home/pi/.config/lxpanel/LXDE/panels/panel
Global {
autohide=1
heightwhenhidden=0
}
/home/pi/.config/pcmanfm/LXDE/desktop-items-0.conf
[*]
wallpaper_mode=color
wallpaper_common=1
wallpaper=/etc/alternatives/desktop-background
desktop_bg=#ffffff
desktop_fg=#ffffff
desktop_shadow=#000000
desktop_font=Sans 12
show_wm_menu=0
sort=mtime;ascending;
show_documents=0
show_trash=0
show_mounts=0
Make sure that mode is set to off.
/home/pi/.xscreensaver
mode: off
Get and Compile JPhotoFrame
Now that the system is set up it's time to build the photo frame software itself.
Clone JPhotoFrame from GitHub
Commands
cd ~
git clone --depth=1 https://github.com/ikromin/jphotoframe.git
cd jphotoframe
Edit jphotoframe.properties and set the jdk.home.1.7 property.
jphotoframe.properties
jdk.home.1.7=/usr/lib/jvm/jdk-7-oracle-armhf
Build JPhotoFrame.
Commands
ant
cp out/artifacts/jphotoframe/jphotoframe.jar .
Set up a crontab
JPhotoFrame includes a script to turn the USB monitor on/off during certain hours of the day, this is done by scheduling an hour job as follows:
crontab -e
0 * * * * bash /home/pi/jphotoframe/onoff.sh
Auto-start JPhotoFrame
Now all that is left is to make sure that JPhotoFrame automatically starts when the RPi boots up. Create the following files to do so.
/home/pi/jphotoframe.sh
#!/bin/bash
cd /home/pi/jphotoframe
sh run.sh
/home/pi/.config/autostart/jphotoframe.desktop
[Desktop Entry]
Type=Application
Exec=/home/pi/jphotoframe.sh
Make sure the script above is executable.
Commands
chmod 755 /home/pi/jphotoframe.sh
Copy Photos
Copy some photos over to the /photos directory or use file sharing to copy files to the RPi.
Enjoy!
That's it, the photo frame should be functional at this point so sit back and enjoy (it's probably taken you 2 or 3 days to get to this point!).
-i
