In case you're going to say that DFP actually supports the 'fluid' ad size, you would be right, but this ad size does not work when using DFP with AdSense as a fallback. Further, the 'Smart Banner' ad style is only available for mobile, so that's a no go either.

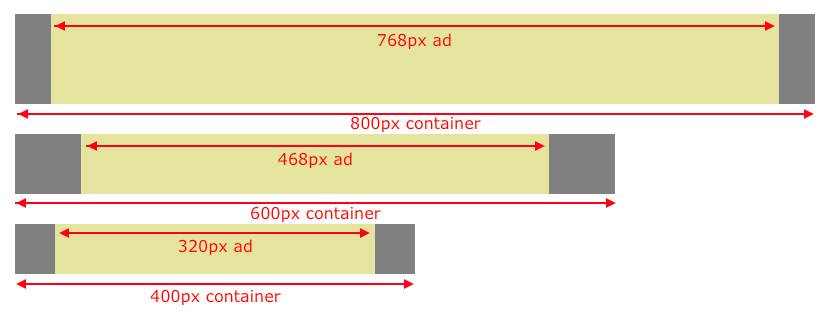
The image below shows the desired results. I wanted to be able to select the most appropriate ad size for any given container based on that container's width. This isn't exactly responsive but if your container is the width of your page it is as close as it gets. This approach works very well if you don't expect ads to resize if the browser window is resized. The ad size is picked when the ad is first inserted into a page and remains static, this still allows the same responsive page to contain ads that work equally well on desktop as on mobile.
So lets see how you can implement this. The first step is to select all of the possible ad sizes. I think horizontal banner sizes work best so that's what I did for my example. This is done in the DFP Inventory console for the ad unit you wish to use on your page.

Now for some HTML. This creates an 800px container DIV with another DIV element inside that will hold the DFP ad slot.
HTML
<div style=" width: 800px;">
<div id="responsive_dfp1" style="background-color:#e5e599;margin: 0 auto;"></div>
</div>
Don't forget to include DFP code inside the <head> element.
DFP Code
<!-- Google DFP -->
<script>
var googletag = googletag || {};
googletag.cmd = googletag.cmd || [];
(function() {
var gads = document.createElement('script');
gads.async = true;
gads.type = 'text/javascript';
var useSSL = 'https:' == document.location.protocol;
gads.src = (useSSL ? 'https:' : 'http:') +
'//www.googletagservices.com/tag/js/gpt.js';
var node = document.getElementsByTagName('script')[0];
node.parentNode.insertBefore(gads, node);
})();
</script>
Then for some JavaScript. Here DFP values for the publisher ID, ad unit name and all of the ad sizes that were picked in the DFP Inventory console are set up. Note the array keys in the dfpSizes array are the widths of the ad and the values are the full ad dimensions.
JavaScript
/* Google DFP configuration */
dfpPublisherId = '99999999';
dfpAdUnitCode = 'YourAdUnitCode';
/* Configured ad unit sizes (from DFP Inventory console) */
var dfpSizes = {
234: [234, 60],
300: [300, 75],
320: [320, 50],
468: [468, 60],
728: [728, 90],
970: [970, 90]
};
The next bit of JavaScript initialises DFP and creates an ad slot for the 800px container. Note that the DFP slot name used, 'responsive_dfp1', is the same as on the inner DIV of the 800px container.
JavaScript
/* initialise Google DFP, but disable initial ad loading */
googletag.cmd.push(function() {
googletag.pubads().enableSingleRequest();
googletag.pubads().disableInitialLoad();
googletag.enableServices();
});
/* create example ad slots */
makeDfpSlot('responsive_dfp1');
Everything so far has been setup and initialisation. The makeDfpSlot() function is where all the real magic happens. That function looks like this:
JavaScript
function makeDfpSlot(slotId) {
var slotElement = document.getElementById(slotId);
var parentElement = slotElement.parentElement;
var parentStyle = getComputedStyle(parentElement);
var maxWidth = parseInt(parentStyle.width);
/* find the most suitable ad width for parent container width */
var pickedWidth;
for (var idx in dfpSizes) {
if (idx != undefined && idx <= maxWidth) {
if (pickedWidth == undefined) {
pickedWidth = idx;
}
else {
if (pickedWidth < idx) {
pickedWidth = idx;
}
}
}
}
/* adjust ad container dimensions to ad dimensions */
var size = dfpSizes[pickedWidth];
slotElement.style.width = size[0] + 'px';
slotElement.style.height = size[1] + 'px';
/* create the ad slot and load ad content */
googletag.cmd.push(function() {
var slot = googletag.defineSlot("/" + dfpPublisherId + "/" + dfpAdUnitCode, size, slotId)
.addService(googletag.pubads());
googletag.display(slotId);
googletag.pubads().refresh([slot]);
});
}
What the above function does is find the DFP slots's DIV parent width. Then, based on that width and the ad sizes configured in the dfpSizes array it picks the largest ad size that would fit inside the parent container. Once the ad size is picked, the DFP slot DIV dimensions are adjusted, a new slot is created and refreshed so an ad will show.
You can find a fully worked example of the above on my GitHub repository here.
This is more work than standard AdSense code but if you combine it with infinite scroll pages it becomes very powerful. I've also wrote another article on how to Insert Google DFP ads with Backbone, Underscore and jQuery.
-i
