Please do not contact me asking if I have the software that came with this cutter - I don't, and even if I did I would not share it because the software appears to have been pirated by the Chinese distributors.
Ok so the ad claimed that the cutter is a USB device. It didn't lie. The provided USB cable plugs into the cutter's electronics and then into your computer. You can see in the photo below that the hole cut out for the USB plug doesn't actually line up with the socket. I had to apply pressure on the board to plug the cable in, it works way, but there is tension on the socket which may cause it to break in time.

While on the topic of plugging things in. Remember that orange USB stick from the first part of the post? Well that's not flash memory, in fact when you plug it in it simply registers as 'USBkey'. What it is is a decryption key that's required to run the dodgy CorelLaser software you need to install. Make sure you don't lose it or you won't be able to operate the cutter.
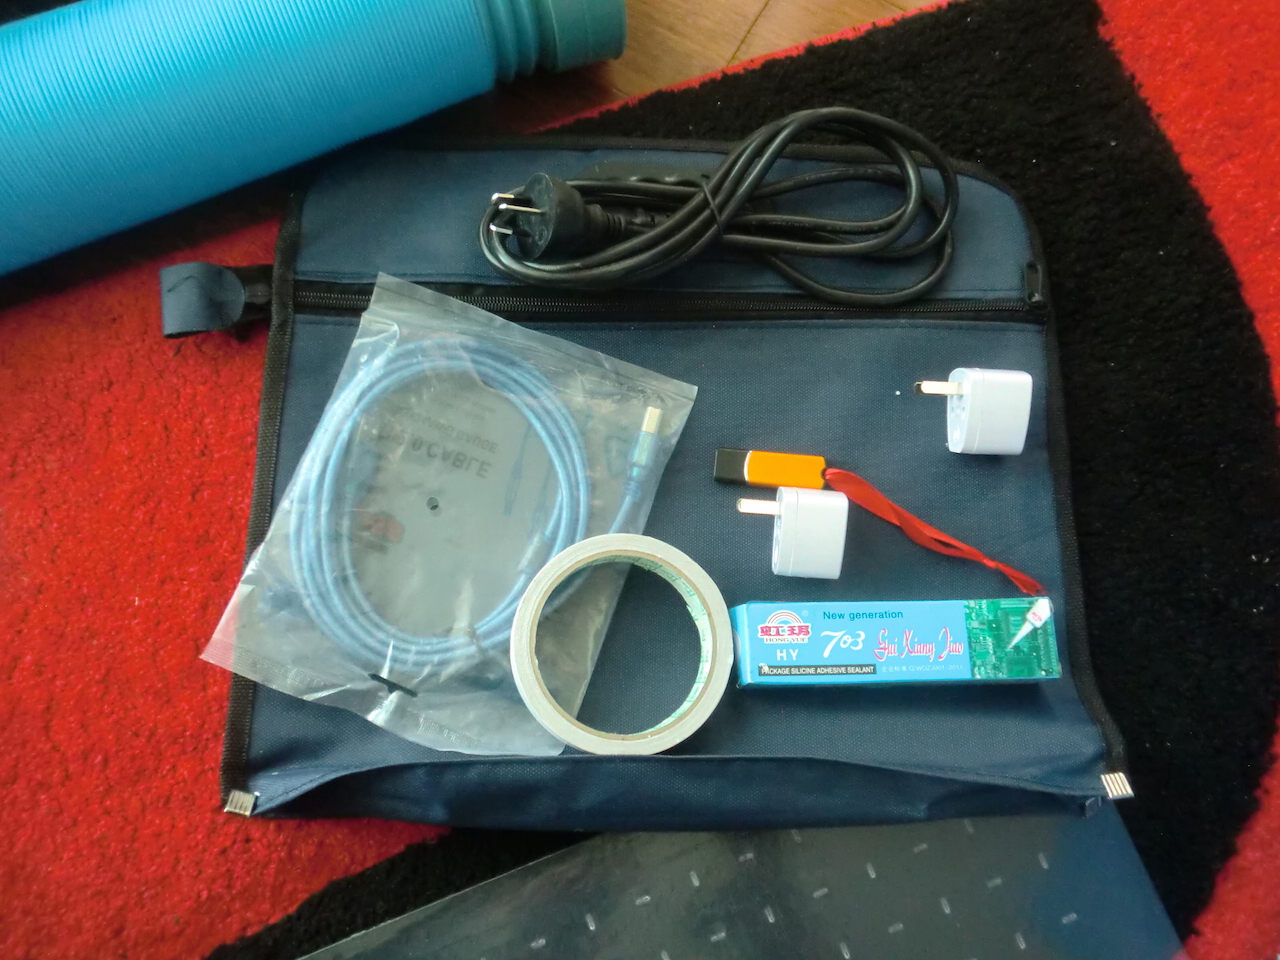
Anyway, software. The burned DVD you get has all the bits you need. Funnily enough my virus checker detected that one of the executables (UKey.exe) there had a trojan virus. Good sign! I didn't want to take a risk so instead of installing on the laptop as is, I grabbed a spare hard disk, which was cloned from another laptop, and installed everything on that (removing the laptop's original hard drive). Since this cloned disk wasn't exactly compatible with the laptop, half the drivers were missing or not working, including the network drivers. This was perfect - if there was a virus it would be stuck on that laptop, yet I could still operate the laser.
This is what you get on the DVD...
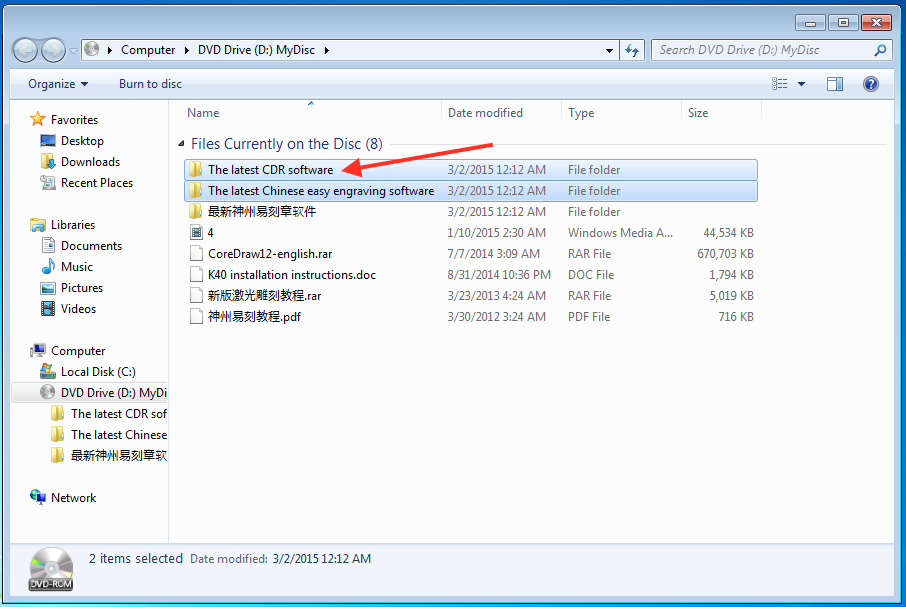
Not sure how legit the Corel Draw software is so I'd advise to use your own licensed version instead. The only thing you really need to install is the CorelLaser 2013.02.exe software from the The latest CDR software directory. This places a shortcut on your desktop that opens up Corel Draw.
There actually is an English manual for the machine on the DVD. I couldn't open this on my Windows laptop because it didn't have Word installed, but I could read it on my Mac. Of course by the time I found this everything was already set up.
When the CorelLaser software is opened, it tries to connect to the machine and if it's switched on and everything is working ok, you get a confirmation. [sic] Engraving machine is conneted!

In the top-right corner is a toolbar to control the cutter.

Now before going any further, you really really need to go and have a look at the controller board for the cutter. This is where you will find out which motherboard revision it uses. This is required to configure the software, if you use the wrong value, the machine will do some crazy things, so make sure you get it right. In my case, this value was 6C6879-LASER-M2:7.

Clicking the gear icon in the toolbar brings up the configuration box, this is where you can select the motherboard version. Select the closest match from the drop down (up to the :, the rest is just a minor revision and shouldn't matter).

Now you're ready to cut! Clicking the engrave or cutting button in the toolbar brings up another window. Here you can position your pattern, this moves the cutting head right away which is handy for alignment to the material you're cutting. I set the speed of mine to 10mm/s so that that cutting is a bit slower. Default was about double that.
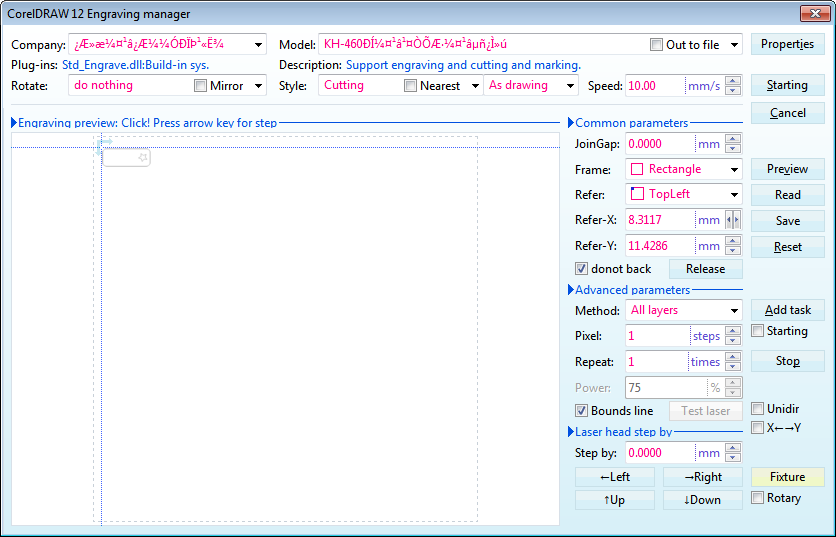
When you're ready to cut, click the 'Starting' button.
I've not really played around much with the other features of this software. I think they are mostly not very relevant. I'd imagine anyone using this cutter would not be doing design on the same computer as the one that's used to operate the cutter. In my case I plan to use Inkscape on my Mac then transfer the design on a USB stick to the laptop connected to the cutter.
By the way, this cutter does not work on a Mac. It also doesn't work with Windows running in VMware since both of those do not detect the decryption key properly.
I've promised videos of the machine in action, these won't fit into this part of the article. The next article about the laser cutter will cover engraving and cutting and will have videos and photos and all that good stuff. I should have that available in the next couple of days. Update: I've written another post that has videos of the cutter in action as well as photos of the various materials I've cut and engraved.
-i
